Month: April 2014

Different Approaches

Recently I got the chance to observe another math teacher at my placement and see what their approach to teaching math is and think about how this style is influenced by their beliefs. I had the teacher that I observed answer the following questions about what they think it means to do math.
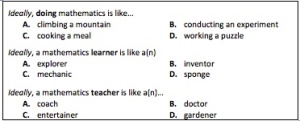
WS 26 PicThe teachers that I observed said that doing mathematics is like working a puzzle, a mathematics learner is like an explorer, and a mathematics teacher is like a coach. The day that I observed the class was doing a review day for an upcoming quiz. The review was set up so that each student had a whiteboard and did problems that the teacher gave. They were working in pairs that provided support for students to work together if they got stuck or a way for them to check to make sure that they got the right answers. As they finished their work students would raise their whiteboards for the teacher to check them and give them either a “yes you got it” or a “nope you didn’t get it yet”. There was one question in particular that a lot of students were getting wrong and the teacher started sharing whiteboards from groups that had the correct answer and having other students going to other groups to help them solve the problems and understand what they should be doing and what they were doing wrong.

After watching the review activity and looking over the answers to the above questions the way that the class session was run made so much more sense. I can see the idea of working a puzzle come through when the teacher was explaining how to find surface area and volume of prisms. He talked about identifying what the question was asking and then to identify what information was needed to solve for what it was asking. I think this speaks to solving a puzzle because those two things are key in solving any puzzle. When I saw him giving whiteboards to struggling students to help them solve the problem I was unsure about how it was going to play out and if it would just lead to students copying their peers work so they could get the right answer. (After watching I didn’t get any indication that this was happening.) I think this strategy fits well with the way that this teacher views learners as explorers. From my observations giving the students the whiteboard was a way for them to explore what they did wrong and what misconceptions they have by seeing what others did and then to discover what they should be doing. Lastly when observing the overall teaching style for this class session the coach persona seemed to fit well with how this teacher was teaching. The approach seemed to be to give students everything they need to solve the problem but ultimately it is up to the student to solve the problem. When these needs varied by students and he adjusted to what the particular student needed to be successful.


After the observation it became much clearer how our beliefs about teaching impact the way we teach. If I were to have observed this lesson without asking the questions that I did I think I would have had a much different view on what I had seen. However, by seeing what beliefs this teacher had about teaching math gave me a clearer lens into why he teaches the way he does and even gave me a few ideas that I may not have thought about before because our views on teaching are different.

Speed Dating in Math Class

Back in February I was able to attend Math In Action (see post here) and in one of the sessions I attended I learned about the use of Task Cards in math class. The basic idea is that you make cards with different math problems of varying difficulty. Each student then gets a card to become an expert on. The great thing about this is you can give students cards based on their ability with the content and what they will feel most comfortable explaining to others without anyone knowing the differences.  Here’s a copy of the task cards that I used as a review of the measurement unit we had just completed.

For each card students do their work on this grid and then their partner for that cards checks it and initials the smaller box if it is correct or helps them to figure out what they did wrong. And then they move on solving the rest of the cards that their peers have. Now on to what we did.

IMG_0442

SPEED DATING!

We switched up the way that I had learned about it at MIA a decided to do a “speed dating” session in order to provide some more structure for our students as this was the first time we had tried anything like this. We lined the desks up in two rows with the desks facing each other. I gave each student a card and told them that this was going to be their card that they needed to know how to explain to a classmate if the classmate got the question wrong. We explained that we would give them a time limit, we started with 2 minutes, 1 for solving the problem and 1 for talking about the solutions. We had to extend this time a little bit as we kept going. After that two minutes one of the rows of students were to move to the next seat over and we would start over again.

IMG_0440

IMG_0439

If you really want to get into the speed dating theme like my CT did you can add the candles on the desk, turn off the lights, and Google some elevator music in the background. Fair warning on this 7th graders will laugh every time you say speed dating or say you should only be talking to your “date”. They did feel awkward when two boys were across from each other but all that fades away rather quickly and our students worked remarkably well.

That being said I learned a lot from doing this the first time. First I didn’t plan well for the time it would take to set up the room and explain what they were supposed to be doing and have them actually get it. We spent close to 20 minutes going over how this would work before students were confident enough to start on their own. It was all worth it in the end when they got to work but its something that really needs to be taken into consideration.

Another idea we talked about doing was making two sets of the same 15 cards so that the class could be divided in half and everyone is still doing the same questions. This would have been beneficial in our case because we didn’t have enough time for each student to get through all the cards. I think this could save a lot of time because students are answering 15 questions instead of 30.

Overall I was really pleased with how this activity worked. Once students got the hang of what they were doing they were on task for at least a solid 25 minutes and even seemed a little disappointed when we had to stop before they had gotten to all the cards. I even had students ask the next day if we were going to be able to finish them. The next time I do this I’m going to definitely have to plan for the startup time better and I think I will go with the two sets of the same 15 cards to make sure students are getting the most out of the cards.

Discovering the Pythagorean Theorem

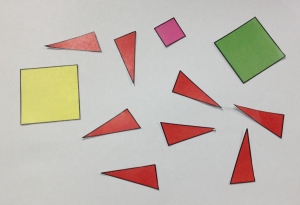
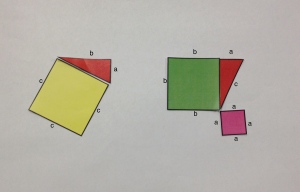
Recently we covered the Pythagorean Theorem in class and I was looking for a proof to use to discover the theorem when my CT gave me one of the area based ones that she has used in the past. I decided to use that one and do a whole class discussion about using this for the proof. We started with this jumbled mess of pieces and then formed them into two squares with each having four of the red triangles.

IMG_2030


After we got them in the squares I told students we were going to label each side with a letter, a for the shortest side, b for the middle side, and c for the longest side. I then asked students to tell me the area of each of the squares that we created. From this we obtained the following,

IMG_2031

Students immediately saw that the area of the squares were equal. After this we talked about if there was anything special about the red triangles in each of our squares. Rather quickly one student explained how the triangles were congruent because all three sides were the same so we have eight congruent triangles so their areas are equal . After we had these two facts nailed down I started removing triangles.

IMG_2032

I removed one triangle from each and asked if the areas of the shapes there were still equal and I got a resounding yes from my students. I then took away another triangle from each.

IMG_2033

I asked again if these shapes still had the same area and got another yes from the students. After this step our discussion got rather interesting. I removed a third triangle from each to obtain this shape,

IMG_2034

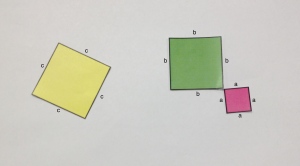
I asked again if these two shapes had the same area but now this time a vast majority of the class yelled NO! This struck me, as this wasn’t something that I would have thought would have been a common answer for the class, although I will admit my CT said this happens most years that she has done this activity(There were a few students who said yes but a majority of the class was not buying it). I asked for a few students to share why these shapes did not have the same area anymore and got very similar answers from all those that shared and it went a little like this. Students talked about how the pink square in the shape on the right was messing with the area because it was somehow different than it was before. The most I could get out of them on what they meant by this was that since it was not connected to a triangle anymore by a side it had to messing with the area. Just to make sure that we were all on the same page about the shape with two triangles I added the triangle back and asked if these had the same area and again they said yes. So I took away the triangle again and asked again if the shapes still had the same area and again I got a no. I asked the class if I had changed anything about the size of any of the shapes. “No”. Then we talked about what we knew about the triangles in each shape. One student said they were congruent and another added that congruence means that they are exactly the same. I thought finally we’re getting somewhere with this. I told students to think about what we knew about the previous shapes and what we just discussed about the triangles. As I waited hands started going up and various students shared that they shapes had to be the same area because the area was same before the third triangle was removed and since we removed congruent triangles the new shape also had to have the same area. I was really happy with the fact that they were able to figure this out! So we removed the last triangle and decided that their areas were also the same and after that triangle we were left with three squares.

IMG_2035

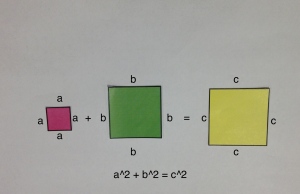
Since we knew the area of each of the squares and that the area of the yellow square was the same as the green and pink squares combined we rearranged the squares and wrote an equation.

IMG_2036

I asked students if they had ever seen this formula before and many stated that it was the Pythagorean Theorem! After we saw where the formula came from we spent some time using it.